How to Translate Live Streams with in Real Time
Live streams are everywhere.
Twitch. Kick. YouTube Live. Online events. Meetings.
But what if the stream is in a language you don’t understand?
That’s where live translation comes in.
Now you can translate live streams instantly while they happen — and read the translation as subtitles on your screen.
How to Translate Live Streams with a Chrome Extension
The easiest way to translate Twitch streams live, or any live stream for that matter, is through Maestra's live transcription & translation extension, which allows users to capture audio directly through their browser and display the live transcript or translation as captions on their screen.
1) Download Maestra AI Live Translation Extension
Head on to the Google Store and download Maestra AI's real time translator extension to start capturing live content.
2) Log in and Start Capturing Audio!

Log in to your Maestra AI account through the extension to be able to send the translations to your dashboard later on.
When the extension is ready, select the original and the target language and click "Start Capture" to start the real time translation!
3) View Real-Time Translated Captions On-Screen

Translations will appear as subtitles on your screen, and you can edit them later on by saving the files to your Maestra dashboard.
Translate Live Streams with the vMix Integration
So, using Maestra's live translator is seamless enough as it is, but to integrate it into your live streams through OBS or vMix, you need to accomplish a few steps.
vMix Integration
Head to the integrations tab on Maestra's live translator. And follow the instructions for the vMix integration.
Before you begin:
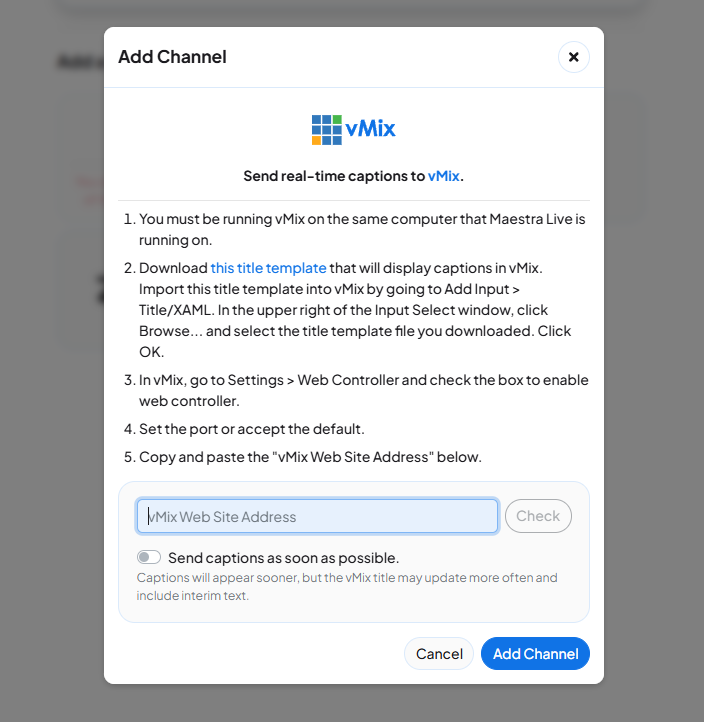
- You must be running vMix on the same computer that Maestra Live is running on.
- Download this title template that will display captions in vMix. Import this title template into vMix by going to Add Input > Title/XAML. In the upper right of the Input Select window, click Browse... and select the title template file you downloaded. Click OK.
- In vMix, go to Settings > Web Controller and check the box to enable web controller.
- Set the port or accept the default.
- Copy and paste the "vMix Web Site Address" as shown in the image below.
After these instructions are done, you can start translating your live streams and reach more viewers through real-time translation!
Translate Live Streams with the OBS Integration
OBS Integration
Head to the integrations tab on Maestra's live translator. And follow the instructions for the OBS integration.
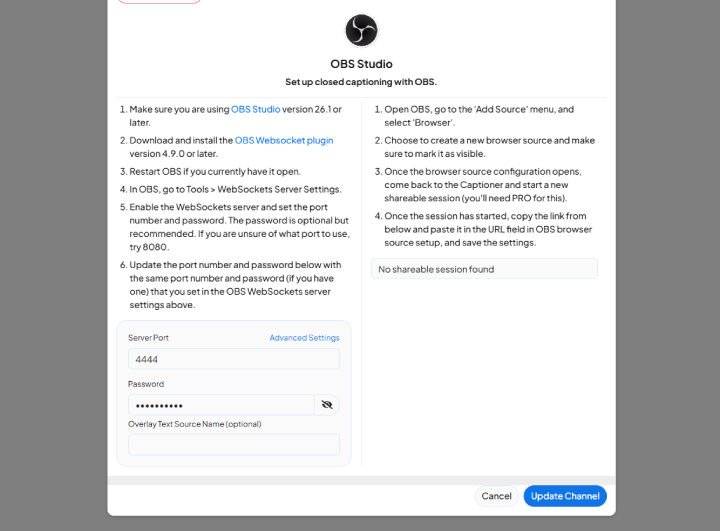
- Make sure you are using OBS Studio version 26.1 or later.
- Download and install the OBS Websocket plugin version 4.9.0 or later.
- Restart OBS if you currently have it open.
- In OBS, go to Tools > WebSockets Server Settings.
- Enable the WebSockets server and set the port number and password. The password is optional but recommended. If you are unsure of what port to use, try 8080.
- Update the port number and password in the section in the image below (that says Server Port) with the same port number and password (if you have one) that you set in the OBS WebSockets server settings above.
After the configurations are done, you can start the session for OBS live captions translation, where users can seamlessly follow through.
What Content Can I Live Translate?
You can translate any live content that your computer can play through audio.
If you can hear it — Maestra can translate it.
That includes:
- Twitch streams
- YouTube Live broadcasts
- Zoom meetings and webinars
- Online classes and lectures
- Live podcasts or interviews
- Discord calls and voice chats
- News, sports, and live events
Just choose the correct original language, pick your target language, and Maestra will generate translated captions instantly.
Translations will appear as captions on the lower part of your screen and they can be edited later on by choosing the "Save File to Dashboard" option on the extension. Maestra's free and online subtitle editor offers detailed subtitle editing to users, allowing them to adjust any part of the subtitles such as their font, size, color, background, position and more.
Conclusion
Live translation is no longer complicated. You can simply speak & translate.
And you can translate live streams in real time with a Chrome extension or a live translator and instantly see subtitles in your target language.
Whether you’re watching Twitch, YouTube Live, meetings, or online events, Maestra makes live stream translation simple, fast, and accessible.
FAQ
Can you translate Twitch streams live?
Yes. Maestra works as a real-time Twitch translator, allowing you to watch Twitch streams with live translated captions in any language.
What is the best Chrome extension for live stream translation?
One of the best Chrome extensions for live stream translation is Maestra’s Live Translation Extension. It translates live streams in real time by capturing audio from your browser and showing instant translated captions on your screen. It works well for platforms like Twitch and YouTube Live and supports over 125 languages.
Can you translate live streams in real time?
Yes. You can translate live streams instantly using Maestra’s Live Translation Chrome Extension. It listens to the stream audio and shows translated captions on your screen as the content plays.
How do I translate a live stream with a Chrome extension?
To translate a live stream in real time:
Install the Maestra Live Translation Extension
- Log in to your Maestra account
- Choose the original and target language
- Click Start Capture
Translated subtitles will appear instantly.
How do I get translated captions on Twitch?
Maestra provides translated captions directly on your screen while you watch Twitch. Just start capturing audio through the extension, and subtitles will appear live in your selected language.
Can I use live translation in OBS or vMix?
Yes. Maestra supports integrations for both OBS Studio and vMix, allowing you to display real-time translated captions directly inside your live broadcast.
