15 Must-Know Video Editing Tips for Beginners
Video is among the most powerful content forms of all types. Whether you are a casual vlogger, a teacher, or a business professional, videos are great mediums for educating and engaging your audience.
But, as the video creation field becomes more and more competitive, creating quality videos becomes more important. Therefore, in this blog post, we will break down some of the most important video editing tips for beginners.
Let's get started!
Best Video Editing Tips to Stand Out
In a cluttered digital world, videos stand out and grab people’s attention. So if you want to be a successful content creator, you should definitely learn how to edit videos to keep your audience engaged. Here are the best tips for video editing:
1. Focus on How You Would Like to Tell Your Story
Video creation is about telling a story. That story might be an educational lesson for students, training for business teams, or personal creation. The best editing helps you tell your story in the best way possible.

Before jumping into the editing process, figure out your story and some details. Ideally, this should take place before filming, but it’s still helpful to review before editing. Furthermore, you may be able to create a new story from footage you already have.
Based on your footage and story, plan out some editing guidelines. Make notes about where you may want to add royalty-free music or other effects.
2. Create a Storyboard
A storyboard is a simple drawing of the scenes in your video. Creating a storyboard helps you plan the structure of your video and saves you time during the editing process.

To create one, you need to divide your video into scenes and draw simple sketches of those scenes or write descriptions. Make sure to include camera angles, dialogues, actions, and any effects you want to use in that scene.
When you have a storyboard to refer to while editing videos, you can create a video exactly how you envisioned it in the beginning.
3. Choose Your Video Editing Software
Before you can get into the editing portion of video production, you must choose the right software. There are plenty of video editors out there, but not all are a good fit for your work and experience level.
Consider your goals, budget, resources, and experience level when choosing a video editing tool. If you’re primarily filming and making videos for social media use and don’t have a strong video card on your computer, then a mobile app for video editing may be a good solution.
Those using a camera to film long-form videos such as 2 may prefer more advanced video editing solutions like Adobe Premiere Pro. But, don't worry. There are free or less expensive software options that can still help you produce high-quality videos.
A few ideas for video editing platforms to check out include:
- Final Cut Pro
- After Effects
- DaVinci Resolve
- Lightworks
- Sony Vegas Pro
- Autodesk Smoke
- Apple iMovie
- Windows Video Editor
4. Master the Tools Your Video Editing Software Offers
After finding the tool that aligns with your needs, you should practice and learn the basics of the software before you start editing. You can watch tutorial videos and use short projects to practice.
Focus on timeline editing, audio adjustments, transitions, and exporting options to master the fundamental tools. Learning the basics will provide you with more confidence in navigating the software program and with a basis for experimenting with advanced features later.
5. Use Keyboard Shortcuts
Time is of the essence for any project, and video editing can certainly take up a lot of it. Any time-saving tips are worth using. One helpful video editing tip is to use keyboard shortcuts.

Much like you can “ctrl+c” to copy on Microsoft Word, you can use keyboard shortcuts to perform several in-app editing functions. However, each program has shortcuts specific to its software.
You may be able to customize the shortcuts. Create a key you can easily reference while you’re learning them, or consider an editing keyboard!
6. Have an External Hard Drive Handy
Before you get started with video creation, it helps to have an external hard drive handy. Keep your video files, including raw footage and complete videos, on the external hard drive.

Video files are huge, and they can quickly eat away at your computer storage. However, keeping the files can help you create more content in the future, so they are often helpful to keep. Working from your external hard drive also keeps your computer clutter-free.
7. Leverage Cuts
One of the most important parts of the editing process is making cuts. Cutting refers to removing long pauses, closing dialogue gaps, and/or eliminating lines of dialogue altogether.
Cutting on action, or cutting midway between a part in a scene can help ensure smoother transitions. Properly cutting your video helps make it more engaging, concise, and beneficial for your audience. The truth is that it’s hard to film the perfect video.
To save time on filming and still put together a useful video, it helps to make tight cuts. Not to mention, cutting the video can help you meet quotas for the running time of your video.
8. Include B-Roll in Sets of 3
A-roll is the primary footage while B-roll is the supplemental footage. B-rolls support your main footage by adding context, and one of the most beneficial video editing techniques is using B-rolls.
B-rolls including motion graphics help bring a video to life. It helps visually break up a video and illustrate your point. But if you don’t include B-Roll footage correctly, then it won’t have the desired effect.

One simple rule of thumb is to include B-roll clips in sets of three. Add three B-roll clips to support a segment of your video. For example, you can use a closeup, a medium shot, and a wide shot. This adds variety to the visuals and keeps the audience engaged.
The placement of B-rolls is also important. Identify the places that can benefit from more visuals while you narrate your story. You can also use them to deal with the gaps in dialogues or awkward transitions.
9. Make Use of Color Correction
Color correcting ensures consistent coloring of the footage in every scene while color grading gives your video a specific look. They are important design elements that can help your video stand out immensely.
If your clips are shot under different lighting, color correction is the key to ensuring all clips match in color and your video looks polished.
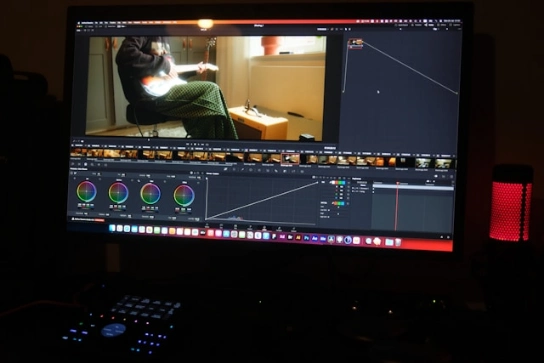
Making sure your coloring is consistent, appealing, and indicative of your brand is important. Most video editing programs come with built-in color correction tools. You can adjust the brightness, contrast, saturation, and white balance of the scenes.
10. Include The Right Music
Visuals aren't the only part of your videos. Music plays a huge role too. Even if you aren’t making a music video, every video content can benefit from the right music and sound effects. For example, using music in educational videos can help keep them interesting, as long as it’s not too distracting.

Use music to create the right tone and help tell your story. There are plenty of websites where you can get royalty-free music to include in videos. Some platforms allow you to search for and add music as well.
A few tips regarding music in your videos include:
- Adjust the volume of the music so it is not too loud.
- Ensure smooth transitions between songs.
- Use headphones while editing videos, so you can best check the sound quality.
Bonus tip: cut your videos to music for a smooth look and an enhanced emotional impact. To do this, you'll need to choose and add the music BEFORE you make your cuts! This makes transitions and cuts feel more professional and creates a sense of rhythm.
11. Add Graphics and Text
Depending on the type of video content you’re making, text and graphics could be important. These are especially helpful for videos meant to inform or educate. Text and graphics can help reiterate a point and keep your audience focused.

Keep your graphics or text simple and consistent. Most video editing software includes pre-built templates you can use or customize to your liking. Of course, you can also make custom graphics to include in your videos using Canva or other similar programs.
How to Make Training Videos with AI in 8 Steps
12. Always Review
After you’ve completed your video editing, it’s tempting to export and upload as quickly as possible. Even if you have a lot of videos to create, don’t skip the review!
Watch your video back completely, possibly more than once. This helps you see how the edits look and if you need to make additional adjustments. It’s a lot easier to do this before uploading your video than it is to have to make the changes and re-upload.
If you’ve been working on the video for a long time, take a break before reviewing and/or have some other eyes check out the project.
13. Avoid Using Effects Excessively
Too many effects can be distracting for the audience. Especially if you are creating long-form content such as vlogs and tutorials, you should keep your audience focused.

Have a consistent style for effects throughout your video. Taking a break and watching your video will help you identify any areas that need changing.
Stay away from flashy transitions and animations unless they add value to the moment. Simplicity will allow you to convey your message more clearly without interactions.
14. Export Using the Correct Settings
When the time finally comes to export your video, you want to ensure you use the correct settings. Using the wrong settings can lead to unnecessarily large files and/or poor quality once you upload them.
Consider where you plan to use the video. If you plan to upload the same video in several places, then you may need to render it more than once. However, you may be able to select a render setting that suits all of your upload needs.
Each site provides its recommended export settings. Some editing platforms also have pre-set render options (for example, you can choose the “YouTube” option to render for YouTube’s ideal settings.
It may also be tempting to choose the highest possible resolution. If your video will play on huge screens, then this may be necessary. But, videos used on social media won’t need to be rendered in the maximum resolution.
15. Add Subtitles
One of the best video editing tips anyone can give you is adding subtitles. Captions and subtitles can make your video more accessible to people who are hard of hearing or who speak other languages.
There are plenty of reasons to add subtitles to your video, but doing so can take a ton of time. Luckily, Maestra has a much more efficient solution.
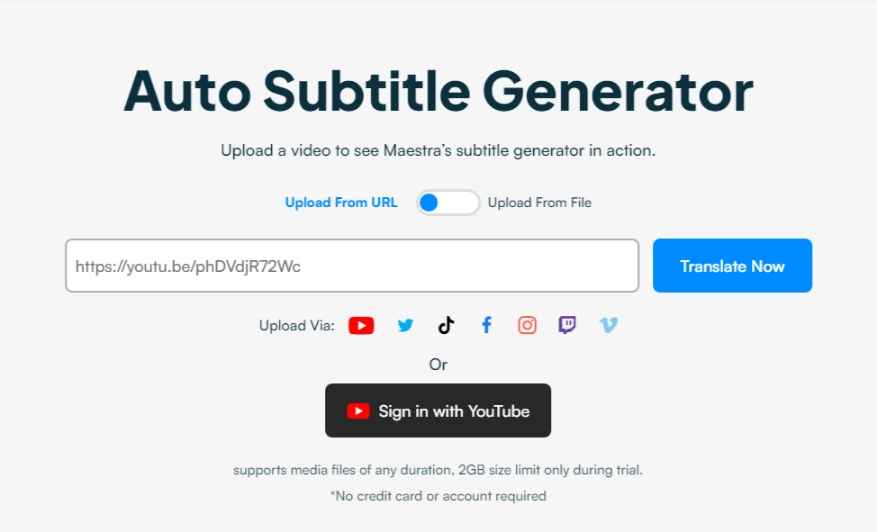
Save time and effort while avoiding human error and timing issues with Maestra's auto subtitle generator. All you need to do is upload your video file, select the language, and then start the automatic generation. Receive your subtitles back within minutes, and translate them to 125+ languages as well.
Export to MP4 to have your new subtitled video file, or download the subtitles and add them to YouTube for subtitle options in many languages.
Key Takeaways
While video creation certainly takes time and practice, following these video editing tips can help any novice video editor create excellent videos.
Just remember to take your time and be patient. Take plenty of breaks to refresh your mind, as editing requires a lot of attention.
Over time, you’ll quickly find that you improve and can create excellent videos without fancy tools or a ton of time.
If you want your videos to be even more accessible and reach a wider audience, then use Maestra’s automatic subtitle generator to add subtitles in over 125 languages. Try it out for free or request a demo to learn more about how this tool works and how it can benefit you!
Frequently Asked Questions
How can I get better at video editing?
Make practice and gain hands-on experience. Watch tutorial videos, and try to apply what you’ve learned by editing small clips.
Learn your video editing software’s features and keyboard shortcuts. Follow the trends, and upgrade your tools as necessary.
Watching well-edited videos can also help you to see what makes a difference between an ordinary video and a well-structured one.
What is the 321 rule for video editing?
The 321 rule is a recommended practice to protect your video clips.
It is recommended that you should:
- Have at least 3 copies of your project.
- Have 2 different places to store your copies.
- Store one of your copies offsite.
These best practices can help you with backup protection. Even if you lose one copy, you will still have others to work on, or you can recover the older versions even if you mistakenly delete a scene while editing.
How to edit video like a pro?
Yes, video editing is a difficult skill to master because it requires technical knowledge and a deep understanding of the software you use. While it mostly relies on measurable abilities, video editing also requires a great amount of creativity and time-management skills.
But, there are many resources that can help you master video editing. You can benefit from a guide on video editing tips, learn how to edit a video, and improve your video editing skills if you are interested in this field.