How to Use Speech-to-Text in Google Docs (Desktop & Mobile)

When in a creative flow, you might want to capture your ideas before they fly away, and speech-to-text in Google Docs can be the ideal tool for that. The feature, also called voice typing, transcribes your voice into written text within the document. It speeds up writing in some cases and minimizes interruptions while brainstorming out loud.
In this blog, we'll:
- Share step-by-step instructions on how to use speech-to-text in Google Docs
- Highlight the crucial role of voice commands and how to utilize them for increased efficiency
- List 7 tips for a productive Google Docs voice typing experience
Let’s go.
How to Enable Voice Typing in Google Docs
First things first: You must turn on voice typing if you want to convert speech-to-text in Google Docs. Follow these steps when using Docs on your computer.
- Go to Google Docs. Start a new document or open an existing one.
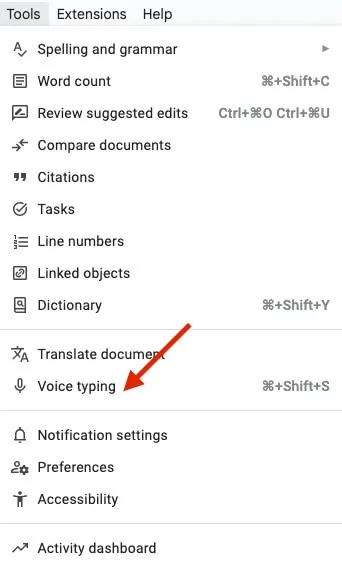
- In the document, click the Tools menu in the top bar.

- Choose Voice typing from the dropdown menu.

- You will see a microphone icon. A pop-up will appear if you’ve never used voice typing in Google Docs before. Click on Allow this timeor Allow on every visit to grant permission to your microphone.
What if you accidentally block microphone access? Don’t worry; click the three dots in the top right corner on Chrome and choose Settings from the dropdown menu. Then click Privacy and security>Permissions>Microphone. Choose “Sites can ask to use your microphone” under Default behavior.
- Click the microphone icon. It will turn red. Now you can speak and Google Docs will transcribe your speech to text.

- Click the microphone icon again when you’re done.
🚀 Tip: The keyboard shortcut for voice typing is Ctrl+Shift+S in Windows and Command+Shift+S in macOS.
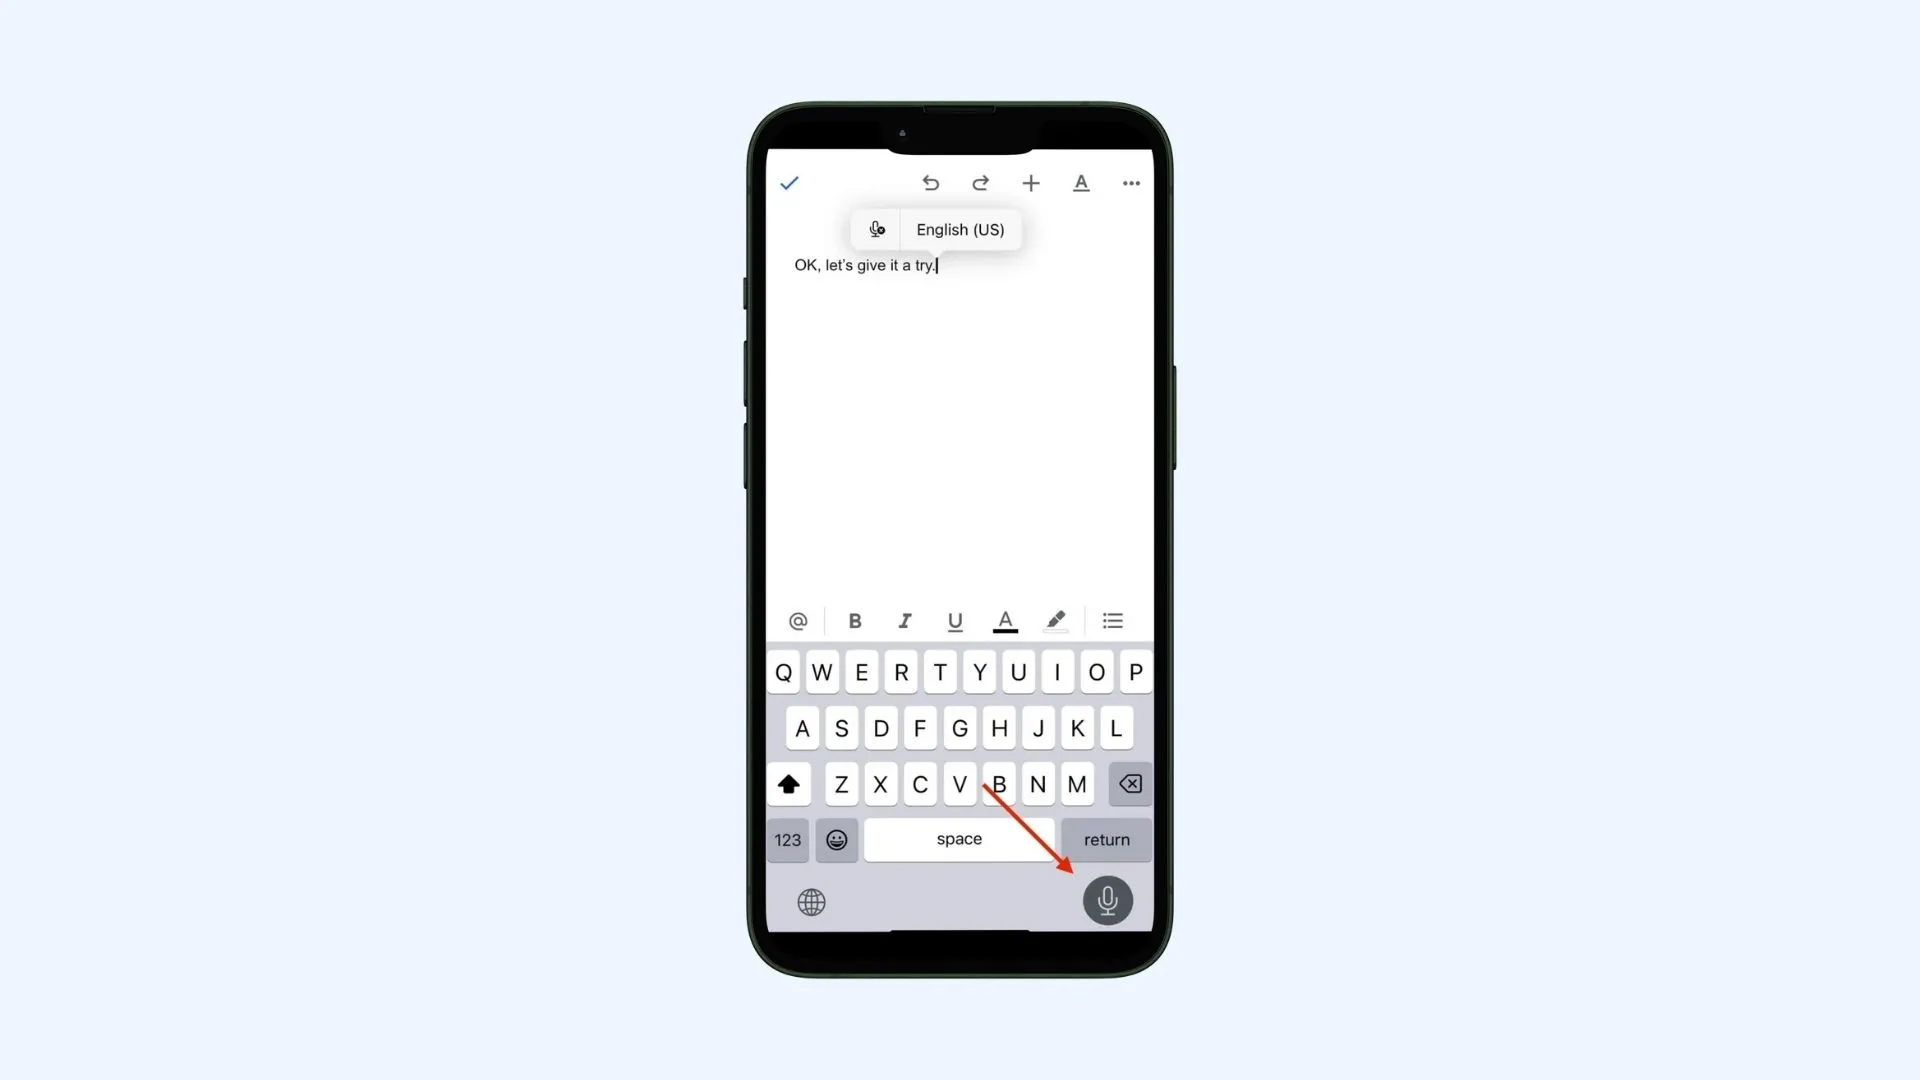
If you want to activate voice typing on your phone using the Google Docs app, open the app and start a new document or open an existing one. Tap the microphone icon in the bottom right corner and select the language you’ll be speaking. Then, start talking. Google Docs will transcribe your speech into text as you go. When you’re finished, simply tap the microphone icon again to stop.

How to Use Voice Commands in Google Docs
Besides dictation, voice commands in Google Docs allow you to add basic punctuation, edit and navigate the document, apply formatting, and insert a table. We’ll list the essentials in this blog but you can always check Google Docs Editors Help for detailed information.
Important: As of August 2025, voice commands are available only in English. Google points out that both your account language and document language must be in English.
Add Punctuation
- Say “Period” to add a period.
- Say “Comma” to add a comma.
- Say “Exclamation point” to add an exclamation point.
- Say “Question mark” to add a question mark.
Navigate and Edit the Document
- Say “New paragraph” to start a new paragraph. Keep speaking.
- Say “New line” to start a new line. Keep speaking.
- Say “Select paragraph” to select a paragraph.
- Say “Select [word or sentence]” to select a specific part of the text.
- Say “Delete [word or sentence]” to delete a specific word or sentence.
- Say “Delete last word” to delete the last word typed or transcribed.
- Say “Select [word or sentence]” to highlight the portion of the text you want to copy. Say “Copy”.
- Say “Paste” to paste the copied word or sentence.
- Say “Insert horizontal line” to add a horizontal line.
- Say “Insert page break” to add a page break.

Format the Document
First, choose the text you want to format as mentioned above. Then:
- Say “Apply Heading [1-6]” to make the text a heading and choose its size.
- Say “Apply normal text” to make it a normal text.
- Say “Bold” to make the text bold. Say “Remove bold” to remove bold formatting.
- Say “Italic” to italicize the text. Say “Remove italics” to remove italic formatting.
- Say “Underline” to underline the text. Say “Remove underline” to remove underline formatting.
- Say “Text color [color]” to change text color.
- Say “Highlight [color]” to highlight text.
- Say “Increase font size” to make the text bigger.
- Say “Decrease font size” to make the text smaller.
- Say “Line spacing double” or “Line spacing single” to format a paragraph.
- Say “Create bulleted list” to create a bulleted list. Say “Insert bullet” to add an item.
- Say “Create numbered list” to create a numbered list. Say “Insert number” to add an item.
- Say “Clear formatting” to remove formatting.
Add and Edit Tables
- Say “Insert table” to add a table.
- Say “Insert row” to add a row.
- Say “Insert column” to add a column.
- Say “Delete row” to delete a row.
- Say “Delete column” to delete a column.
- Say “Delete table” to delete the table.
- Say “Exit table” to resume working on the rest of the document.

Your Checklist for Voice Typing in Google Docs
Let’s be honest. Speech-to-text in Google Docs is not super easy to use. The feature is open to errors and can be pretty frustrating when it gets things wrong. Yet it can also be beneficial and save you time.
Speaking your thoughts can sometimes feel more natural than typing them, which means more fluid idea generation and less writer’s block. As an important accessibility feature, voice typing also allows individuals with limited mobility or hand injuries to create content.
Still, you must consider certain factors before converting speech-to-text in Google Docs for optimal results. Here is your checklist:
Environment and Tools
- Minimize background noise. A noisy environment can significantly impact accuracy, so find a quiet location to make sure your speech is picked up clearly.
- Check your microphone. Test its functionality and adjust settings if necessary.
- If possible, use a headset with a built-in microphone. This can reduce the misinterpretation of other sounds.

Speech Style
- Speak clearly and at a moderate pace. Avoid mumbling or speaking too fast.
- Pay attention to punctuation. Dictate punctuation marks like “comma”, “period” or “question mark” to structure your text.
- Take brief pauses between sentences. This will improve transcription accuracy.
Google Docs Settings
- Select the language you’ll be speaking in Google Docs. This will help the software correctly recognize words and structure sentences.
- Google Docs works best in Google Chrome. Download the latest version of the browser for the smoothest experience.
Tips for Using Speech-to-Text in Google Docs
Using speech-to-text in Google Docs requires patience and practice for the best results. Here are 7 tips for a successful dictation experience.
- Keep calm and carry on. Speech-to-text in Google Docs is not perfect so expect mistranscribed words. A calm attitude will keep you motivated.
- Review and edit the document as you go. Don’t wait until you’ve completed much of the dictation to start editing. You will catch errors early and your final edit will become much less intensive.
- Pay attention to homophones. Homophones (words that sound the same but spelled differently) can confuse dictation on Google Docs. Be mindful of words like “there”, “their” and “they’re” and review the text carefully to identify them.
- Practice, practice, practice. Familiarize yourself with the voice commands for maximum efficiency. The more you practice using these, the more seamless your dictation will become.
- Utilize the personal dictionary. If you’re using specialized terms frequently, then you can add them to your personal dictionary, which can be accessed via Tools>Spelling and grammar>Personal dictionary. Speech-to-text in Google Docs will recognize these words and phrases, enhancing accuracy and reducing potential errors.
- Take short breaks to avoid fatigue. Speaking for an extended period can strain your voice. Schedule breaks to rest and refocus, which will make the whole dictation process more productive in the long run.
- Check for updates. Speech-to-text in Google Docs is constantly improving. Stay updated on new features to make sure you get most out of the tool.

An Alternative to Google Docs Voice Typing
Yes, Google Docs can transcribe speech to text for free and might suffice for casual notes or brainstorming sessions. However, when it comes to more serious documents where accuracy is critical, I personally prefer to use an AI-powered audio to text converter.
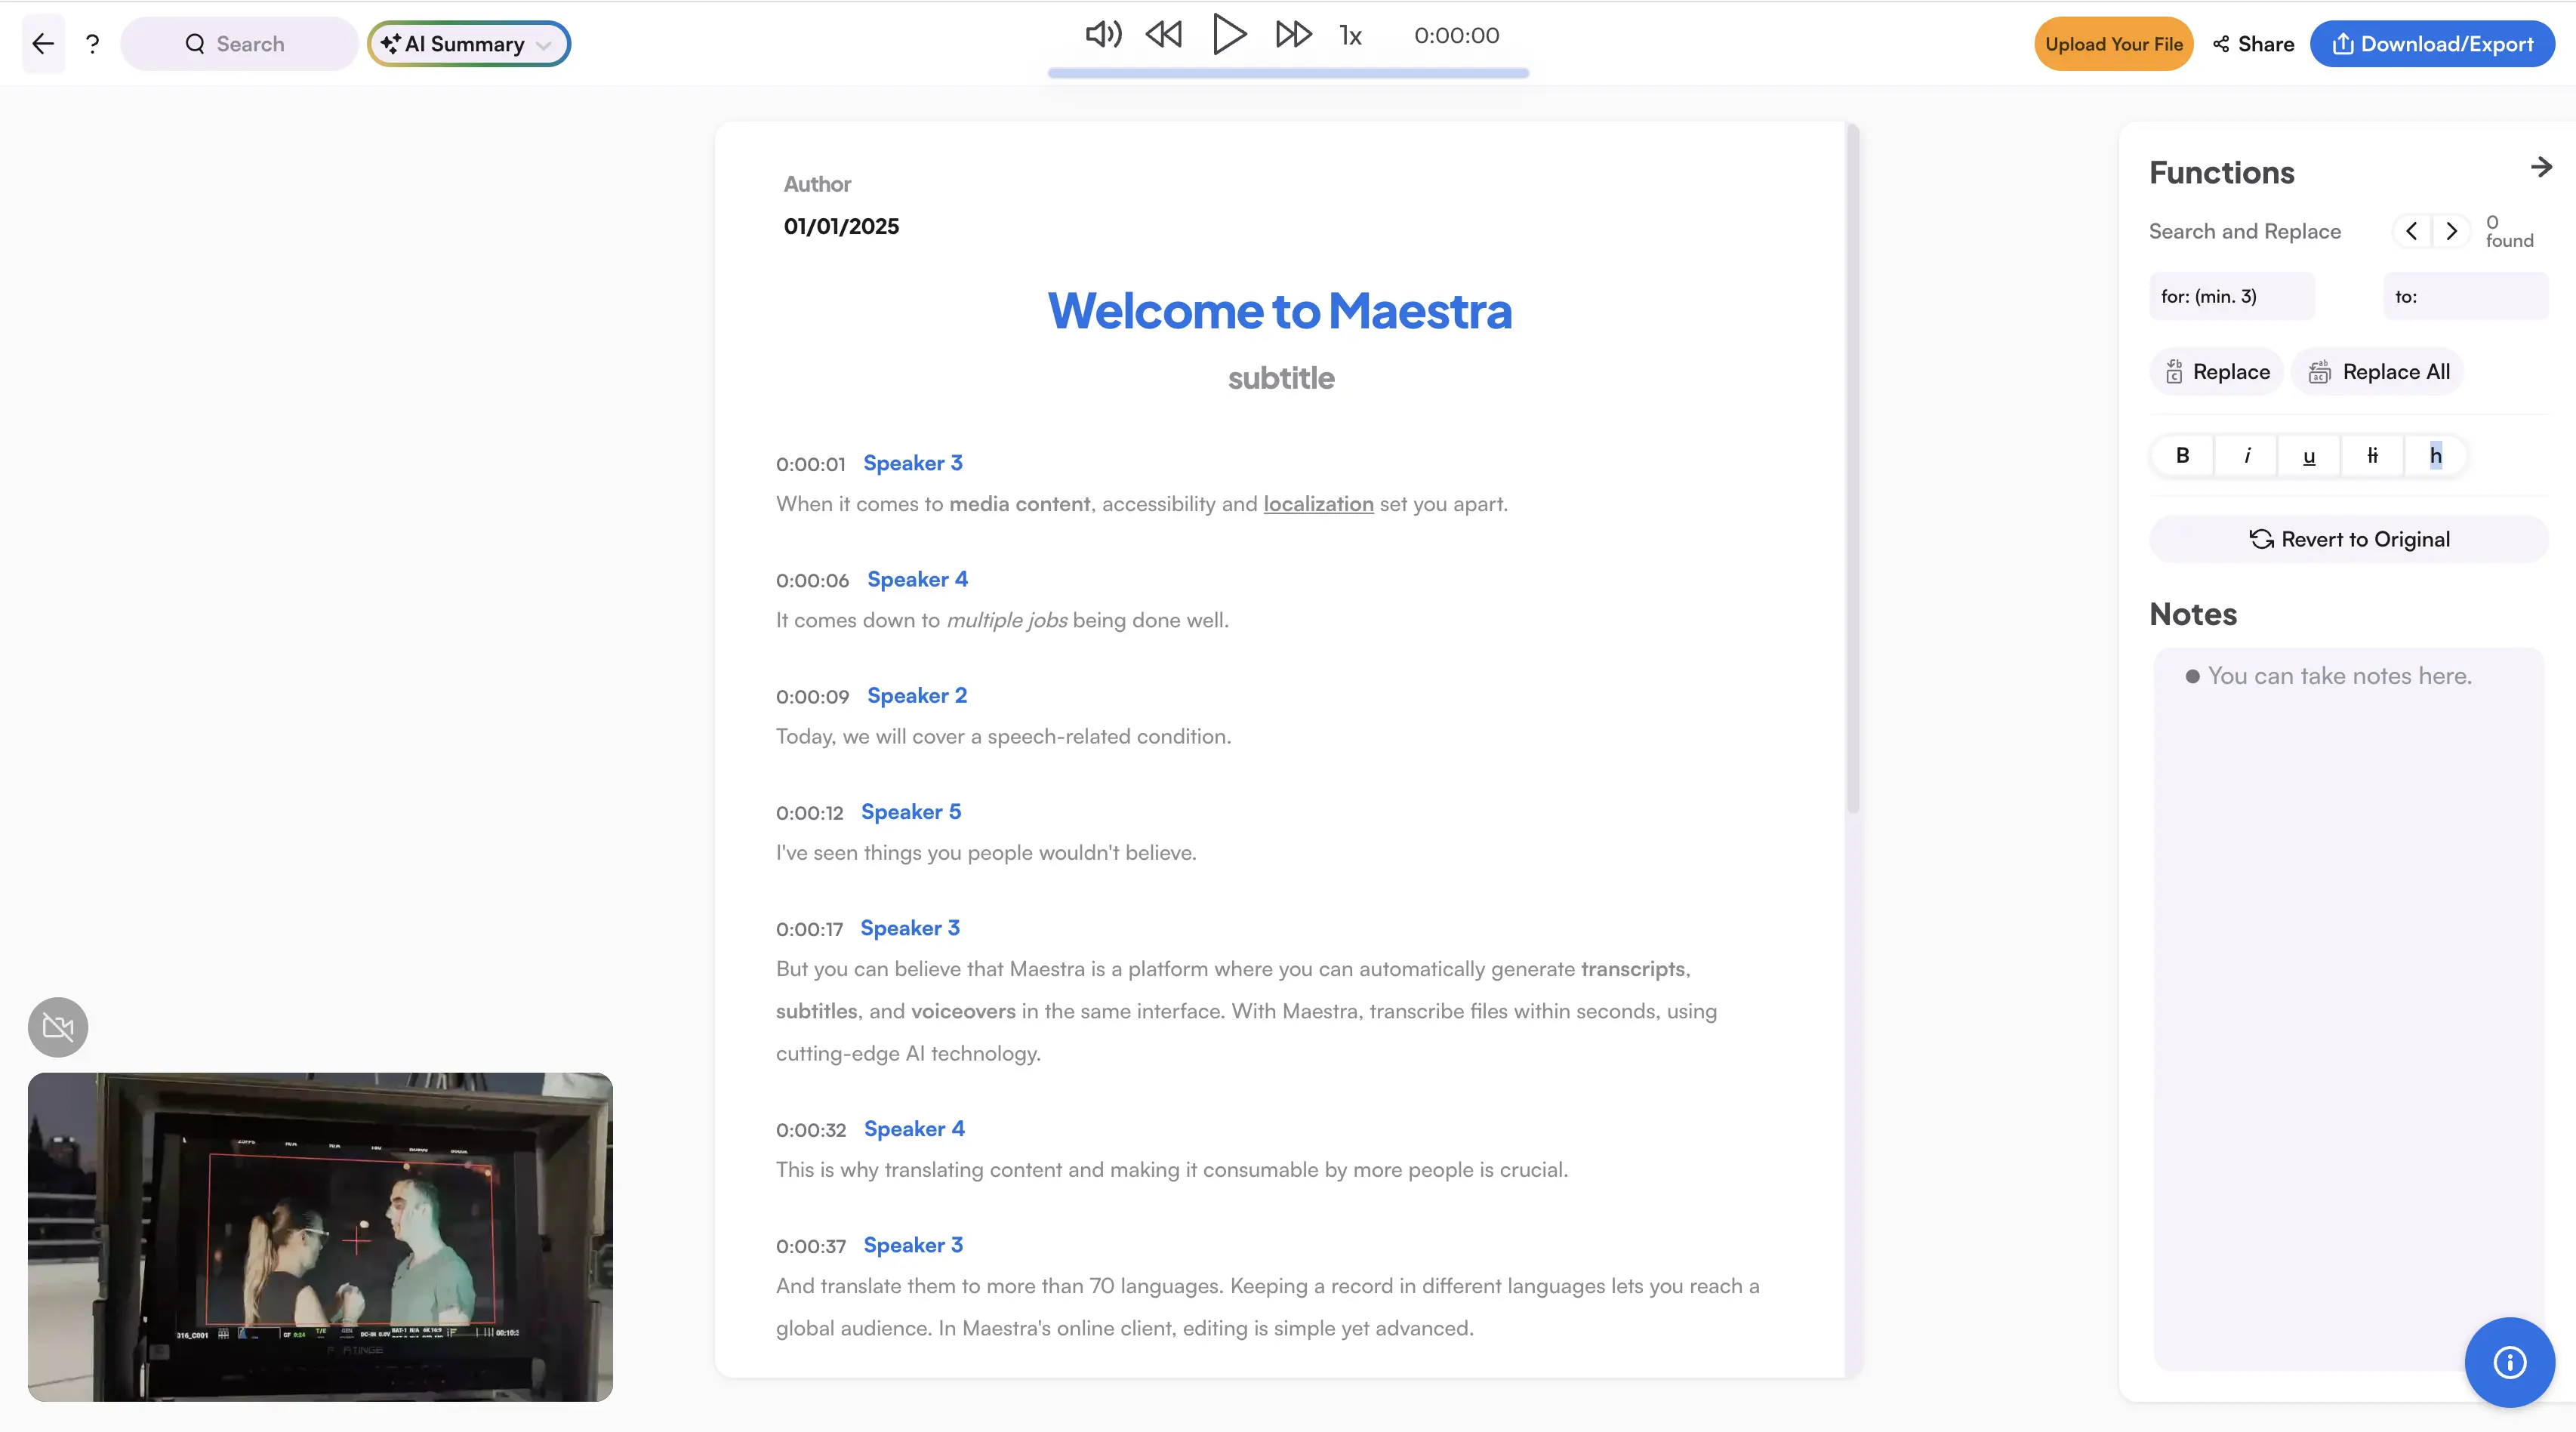
For example, transcription tools like Maestra allow you to simply upload your audio file, select the language, and receive a transcript within seconds, with punctuation and speaker identification handled automatically. These tools also include a built-in text editor, so you can make quick adjustments without leaving the platform. This can be especially helpful for interviews, meetings, or content production.

Summary
This blog provided a guide on how to use speech-to-text in Google Docs, including steps for both desktop and mobile. It also emphasized voice commands in 4 different categories: punctuation, editing, formatting and adding tables. The blog finally shared 7 tips for Google Docs voice typing; think of them as the best practices for a smoother dictation experience.
If you’re looking for an even faster and more accurate way to convert your voice into text, try using Maestra’s AI-powered speech-to-text software.
Frequently Asked Questions
Is Google Docs voice typing free?
Yes, voice typing (converting speech-to-text in Google Docs) is free. You don’t have to pay for a subscription. You just need a free Google account.
Why can’t I use the voice typing feature on Google Docs?
Voice typing on Google Docs works with the latest versions of Chrome, Firefox, Edge and Safari browsers. Make sure your browser is up to date and Google Docs has permission to use your microphone. You can check this article for more reasons and solutions.
How do you get Google Docs to speak text?
Google Docs works with screen readers. You can go to Tools>Accessibility and then check Turn on screen reader support. Additionally, several Chrome extensions like Read Aloud offer text-to-speech features for Google Docs.
How do you voice talk on Google Slides?
There’s no built-in feature within Google Slides like speech-to-text in Google Docs. Yet you can use Google’s voice typing feature within the speaker notes of each slide. Go to Tools>Dictate speaker notes and a microphone will appear. Click it to speak your notes.
Does Gmail have the voice typing feature?
Gmail does not have a built-in voice typing for writing emails. However, you can use your device’s voice input tools (such as Google’s voice typing on Android or Apple’s dictation on iOS) to speak your message and have it converted to text directly in Gmail.
Can Google do voice recognition?
Absolutely! You can use your voice to search on Google, translate speech in real time, and convert speech-to-text in Google Docs. Voice recognition technology is also integrated into many other Google products like Google Maps and YouTube.
